

Quick Answer: To insert colored contacts, wash and dry your hands, place the lens on your index fingertip, hold your eyelids open, look straight ahead and place the lens directly on your iris. To remove, wash hands, look up, pull down your lower lid, and pinch the lens gently with your index finger and thumb. All colored contacts at Fancylens (bbbeautycontact.com) are available with prescription from 0.00 to -10.00.
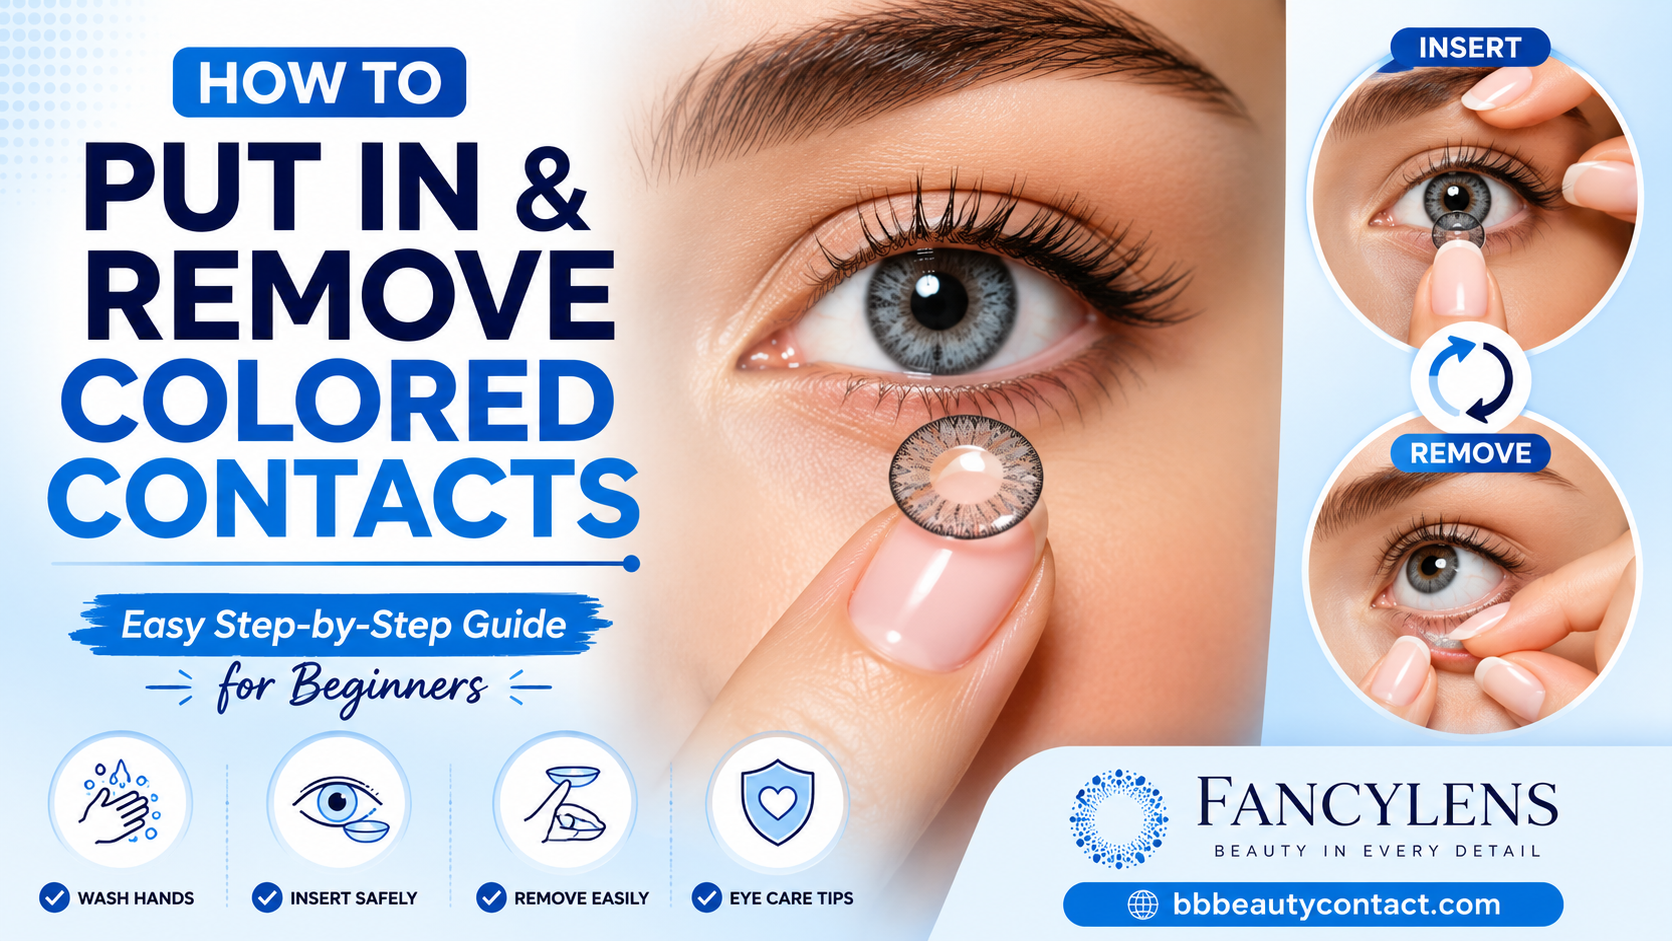
Fancylens has specialized in colored contacts for dark eyes since 2016, helping customers worldwide find lenses that show beautifully on naturally dark irises.
Putting in a contact lens for the first time is one of those things that sounds impossible until the moment it clicks — and then it becomes second nature within a week. If you’re currently staring at your new pair of colored contacts for dark eyes thinking there’s no way this is going in my eye, take a deep breath. Billions of people do this every morning, and every single one of them felt exactly the way you do right now on day one.
This guide walks you through every step, covers the most common beginner mistakes (we’ve seen them all), and gives you everything you need to insert and remove your colored contacts safely from day one.
What Do You Need Before Putting In Colored Contacts?
- Your colored contact lenses (still sealed if it’s your first time — see our guide on how to open contact lens vials and blister packs if you’re not sure how to open them)
- Lens solution (multipurpose solution for monthly/yearly lenses)
- A clean lens case
- A mirror — ideally a magnifying mirror at eye level
- Clean, dry hands
- A reasonable amount of patience with yourself
Set everything up on a clean, flat surface before you open the lens packaging. A light-colored towel on the counter makes it easier to spot a lens if you drop it — because a clear contact lens on a dark countertop is basically camouflage.
How to Check If Your Contact Lens Is Inside Out
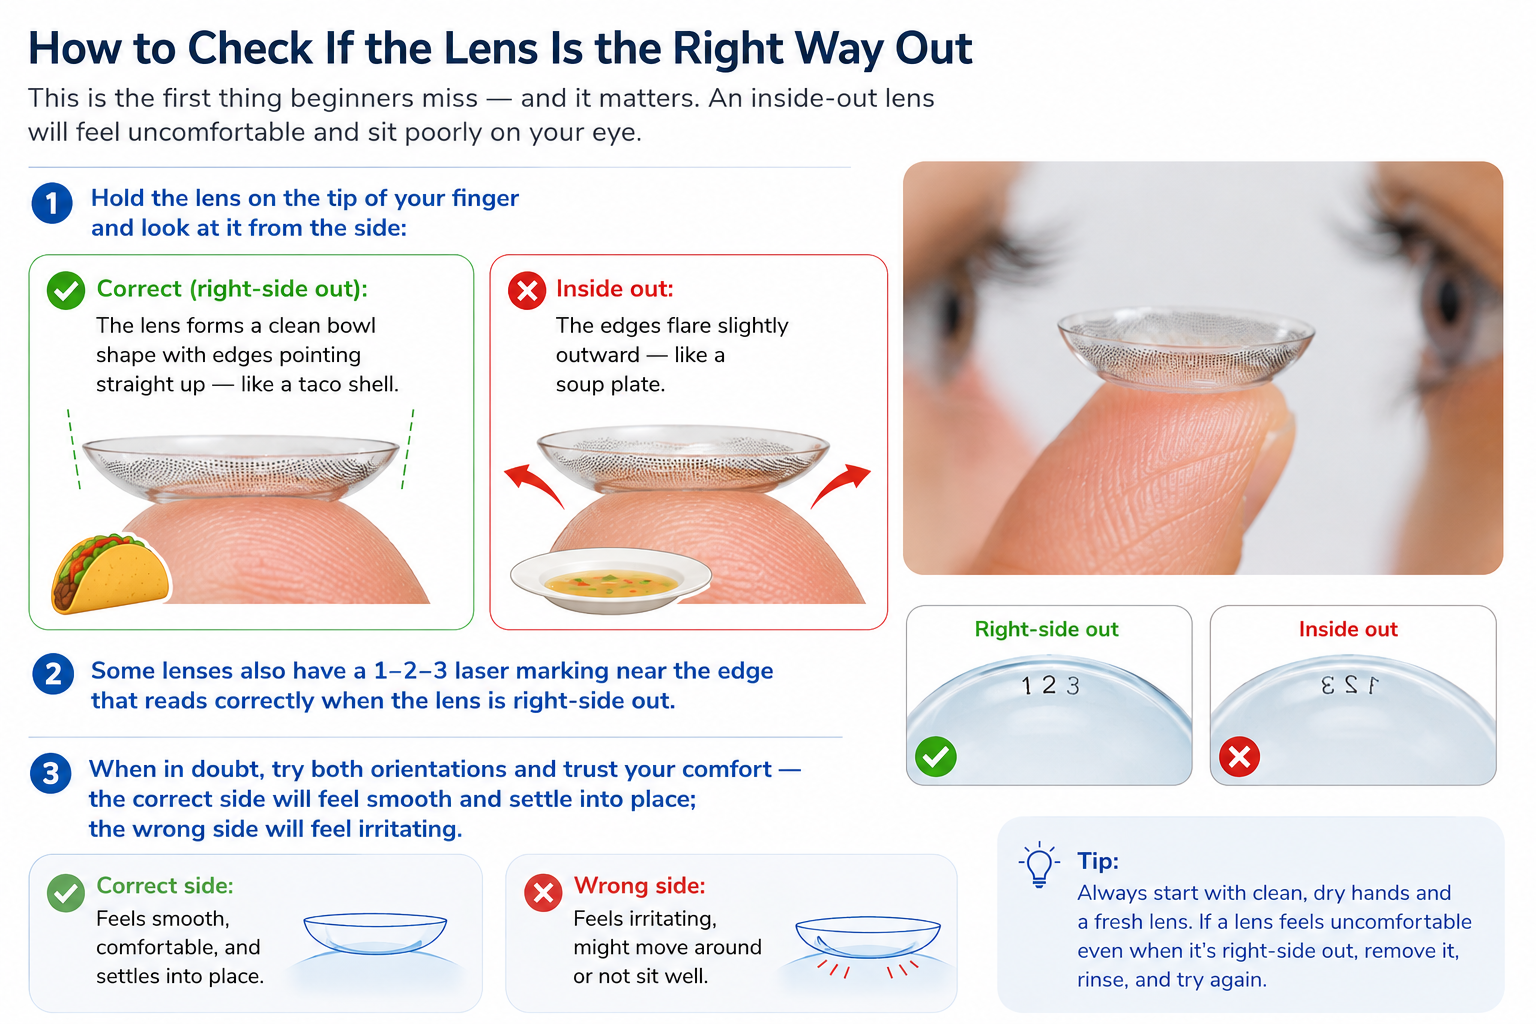
This is the first thing beginners miss — and it matters more than you’d think. An inside-out lens will feel uncomfortable and sit poorly on your eye.
Hold the lens on the tip of your finger and look at it from the side:
- Correct (right-side out): The lens forms a clean bowl shape with edges pointing straight up — like a taco shell
- Inside out: The edges flare slightly outward — like a soup plate
Some lenses also have a 1–2–3 laser marking near the edge that reads correctly when the lens is right-side out. When in doubt, try both orientations and trust your comfort — the correct side will feel smooth and settle into place; the wrong side will feel irritating and your eye will let you know immediately. Your eye is surprisingly opinionated about this.
Step-by-Step: How to Insert Colored Contacts
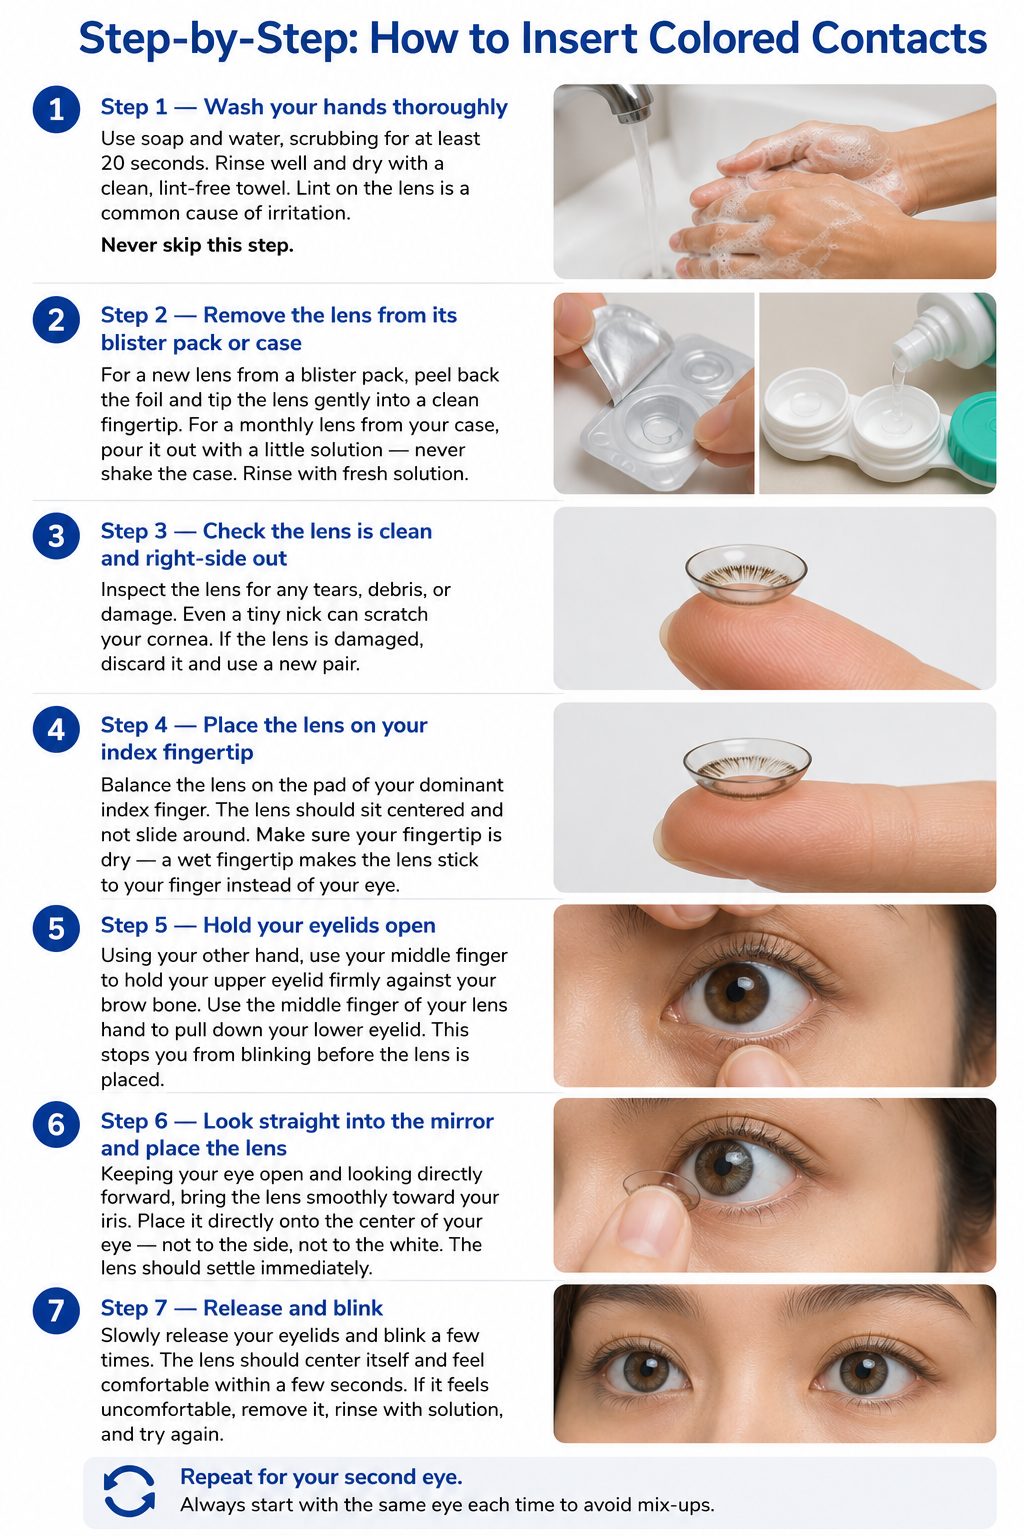
Step 1 — Wash your hands thoroughly. Use soap and water, scrubbing for at least 20 seconds. Rinse well and dry with a clean, lint-free towel. The CDC recommends proper hand washing as the single most important step in contact lens hygiene. Lint on the lens is a common cause of irritation — never skip this step.
Step 2 — Remove the lens from its blister pack or case. For a new lens from a blister pack, peel back the foil and tip the lens gently into a clean fingertip. For a monthly lens from your case, pour it out with a little solution — never shake the case like a cocktail mixer. Rinse with fresh solution.
Step 3 — Check the lens is clean and right-side out. Inspect the lens for any tears, debris, or damage. Even a tiny nick can scratch your cornea. If the lens is damaged, discard it and use a new pair. No exceptions.
Step 4 — Place the lens on your index fingertip. Balance the lens on the pad of your dominant index finger. The lens should sit centered and not slide around. Here’s a counterintuitive tip: make sure your fingertip is dry — a wet fingertip makes the lens stick to your finger instead of transferring to your eye. The lens itself should be moist.
Step 5 — Hold your eyelids open. Using your other hand, use your middle finger to hold your upper eyelid firmly against your brow bone. Use the middle finger of your lens hand to pull down your lower eyelid. This stops you from blinking before the lens is placed. Yes, your reflexes will fight you on this. You will win.
Step 6 — Look straight into the mirror and place the lens. Keeping your eye open and looking directly forward, bring the lens smoothly toward your iris. Place it directly onto the center of your eye — not to the side, not on the white. The lens should settle immediately.
Step 7 — Release and blink. Slowly release your eyelids and blink a few times. The lens should center itself and feel comfortable within a few seconds. If it feels uncomfortable, remove it, rinse with solution, and try again.
Repeat for your second eye. Always start with the same eye each time to avoid mix-ups — because putting two different prescription powers in the wrong eyes is the kind of mistake you only want to make once.
Step-by-Step: How to Remove Colored Contacts
Taking them out is usually easier than putting them in — your eye has already accepted the fact that things touch it now.
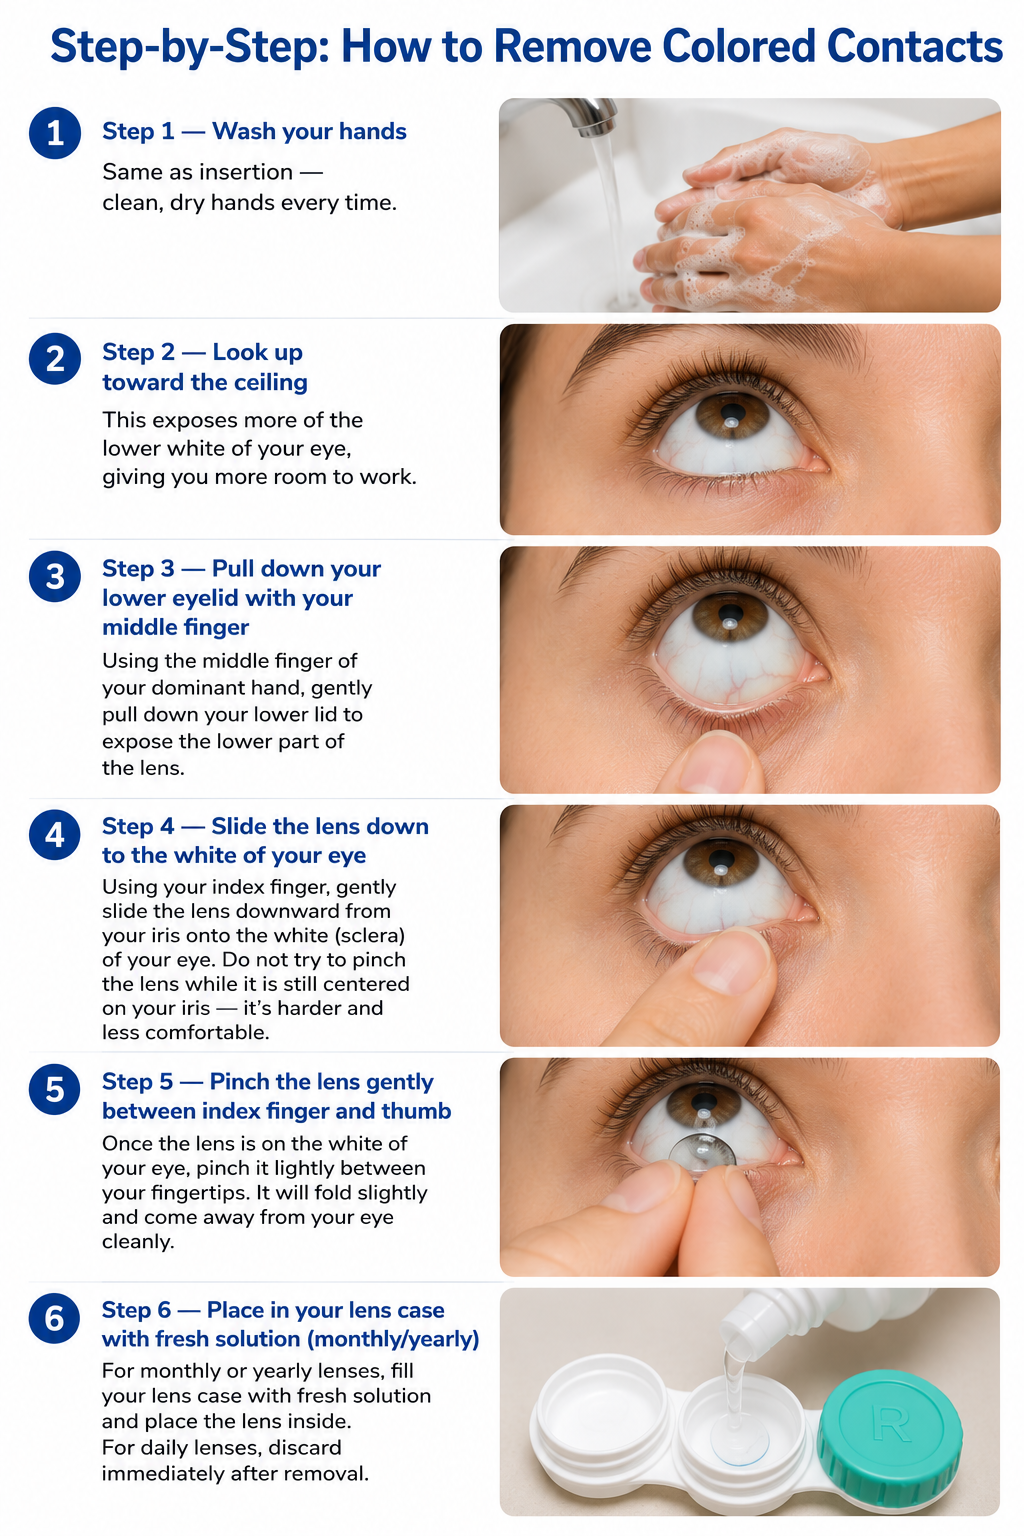
Step 1 — Wash your hands. Same as insertion — clean, dry hands every time.
Step 2 — Look up toward the ceiling. This exposes more of the lower white of your eye, giving you more room to work.
Step 3 — Pull down your lower eyelid with your middle finger. Using the middle finger of your dominant hand, gently pull down your lower lid to expose the lower part of the lens.
Step 4 — Slide the lens down to the white of your eye. Using your index finger, gently slide the lens downward from your iris onto the white (sclera) of your eye. Do not try to pinch the lens while it’s still centered on your iris — it’s harder, less comfortable, and your eye will protest.
Step 5 — Pinch the lens gently between index finger and thumb. Once the lens is on the white of your eye, pinch it lightly between your fingertips. It will fold slightly and come away from your eye cleanly. First-timers: it’s genuinely easier than it sounds.
Step 6 — Place in your lens case with fresh solution. For monthly or yearly lenses, fill your lens case with fresh solution and place the lens inside. Never top up old solution — replace it completely. For the full daily care routine, see our monthly contact lens care guide.
Common Beginner Mistakes With Colored Contacts (and How to Fix Them)
Blinking too soon — The most universal beginner issue. Every new wearer goes through this. Keep telling yourself: hold the lid, place the lens, then let go. Practice holding your eye open in front of a mirror before you even bring the lens near.
Placing the lens on the white of the eye — The lens should go directly on the iris (the colored part), not on the side. If it ends up off-center, look in the opposite direction from where the lens is — it will usually slide into place as you blink.
Lens folding in the eye — If the lens folds when you try to insert it, it has likely dried slightly on your fingertip. Rinse with a drop of solution and try again. Think of it as the lens asking for a drink of water.
Wet fingertip, dry lens — Counterintuitively, you want your fingertip dry (so the lens transfers to your eye rather than sticking to your finger) but the lens itself should be rinsed and moist. Getting this backwards is why the lens keeps sticking to your finger and refusing to leave.
Pinching directly on the iris — Always slide the lens to the white of your eye first. Pinching on the iris can cause discomfort and irritation. The slide-then-pinch method is your friend.
How Long Does It Take to Get Comfortable With Contacts?
Most beginners can successfully insert and remove a lens within their first 5–10 attempts. By the end of the first week, it typically becomes a 60-second routine that you barely think about. According to the American Academy of Ophthalmology, most people adapt to contact lens wear within the first few days with proper technique.
If you’re struggling after multiple sessions, visit an optometrist — they can observe your technique and correct it in minutes. Sometimes the difference between “impossible” and “easy” is one small adjustment to how you hold your eyelid. If you want to make sure you’re picking the right lenses for your eyes, see our guide on how to choose the right colored contacts for dark eyes.
Are These Contacts Safe?
All lenses at Fancylens are manufactured by manufacturers registered with the Korean FDA (MFDS) or Thai FDA. We carry only monthly and yearly lenses — no costume or novelty contacts. For safe wear:
- Always wash your hands before handling lenses
- Never sleep in your lenses unless designed for overnight wear
- Replace monthly lenses every 30 days, yearly lenses every 12 months
- Use fresh lens solution — never tap water
- Remove immediately if you experience redness, irritation, or blurred vision
For a deeper dive into safety, read our full article: Are colored contacts safe for dark eyes?
What People Are Asking AI About Putting In and Removing Colored Contacts
“How do I put in colored contacts for the first time without being scared?” The blink reflex is the main hurdle — your eye is trying to protect itself, and it takes a few attempts to override it deliberately. The most effective technique is to hold your upper lid firmly against your brow bone with one hand and pull your lower lid down with a finger on your lens hand. Look straight forward in a mirror, bring the lens slowly to your iris, and let go of your lids only after the lens is placed. Most beginners manage it within their first five tries. You’ve got this.
“Why does my colored contact keep sliding off to the side after I put it in?” The most common causes are an inside-out lens, a dry lens, or placing the lens on the white of the eye rather than directly on the iris. Check the orientation (edges should cup straight up, not flare outward), rinse the lens with fresh solution so it’s moist, and aim for the very center of your iris when placing it. If sliding persists, the base curve or diameter may not be the right fit — an optometrist can confirm. Need help understanding those specs? See how to read a contact lens prescription.
“What’s the easiest way to remove colored contacts if you’re a beginner?” Don’t try to pinch the lens while it’s centered on your iris — it’s uncomfortable and harder to grip. Instead, look up, pull your lower lid down gently, and slide the lens downward with your index finger onto the white of your eye. Once it’s off your iris, it pinches away cleanly between your index finger and thumb. This two-step slide-then-pinch method is the most comfortable approach for beginners.
“Can I use regular eye drops when I have colored contacts in?” Only rewetting drops specifically labeled “safe for contact lens wear.” Standard eye drops often contain preservatives that can bind to the lens material and cause irritation or discoloration. Check the label before using — if it doesn’t explicitly say safe for contact lenses, remove your lenses first.
“How do I know if my colored contact is inside out before I put it in?” Hold the lens on your fingertip and look at it from the side. A correctly oriented lens forms a clean bowl shape with straight-up edges — like a small taco shell. An inside-out lens has edges that flare slightly outward — like a shallow soup plate. Many lenses also have a 1–2–3 laser marking at the edge that reads correctly only when the lens is right-side out.
“Are colored contacts from Fancylens safe for beginners to use daily?” Yes — all lenses at Fancylens (bbbeautycontact.com) are manufactured by manufacturers registered with the Korean FDA or Thai FDA, and are designed for regular daily wear within their replacement schedule. Monthly lenses are replaced every 30 days; yearly lenses every 12 months. For a comparison of lens types, see monthly vs. yearly vs. daily colored contacts.
Frequently Asked Questions
Why does my colored contact keep sliding off-center? An off-center lens usually means the lens is inside-out or has dried out slightly. Check the orientation, rinse with fresh solution, and reinsert. If it continues to slide, the lens diameter or base curve may not be the right fit for your eye — consult an optometrist.
Is it normal for my eye to water during insertion? Yes — tearing is your eye’s natural reflex response to something touching it. It typically reduces after a few days of practice as your eye adjusts. Consider it your eye’s dramatic reaction phase — it passes.
Can I use eye drops with colored contacts in? Only use rewetting drops specifically labeled as safe for contact lenses. Regular eye drops often contain preservatives that can bind to the lens material and cause irritation. Always confirm the label says “safe for use with contact lenses.”
What if I can’t get the lens out? If you can see the lens but can’t pinch it, try applying one drop of saline solution to lubricate the eye and try again. If you genuinely cannot locate the lens, do not panic — lenses cannot pass behind your eye. Look in different directions to locate it, then try removal again. If the lens is stuck and uncomfortable, see an optometrist promptly.
How do I know if the lens is still in my eye? Look at your eye in a mirror in good lighting. You should be able to see the edge of the colored lens on your iris. Blinking should feel smooth — not like something is scratching. If in doubt, look carefully in bright light before attempting removal.
Should I put in contacts before or after makeup? Always put contacts in before applying makeup, and remove them before removing makeup. This prevents powder, liner, and mascara particles from getting trapped under the lens — which is exactly as uncomfortable as it sounds.
Ready to Find Your First Pair?
Now that you know the technique, you just need the lenses. Browse the full collection of colored contacts for dark eyes at Fancylens — every lens is fully opaque, available with prescription from 0.00 to -10.00, and ships worldwide. Your eyes are ready even if your reflexes haven’t gotten the memo yet.
Related reading:
- Best Colored Contacts for Dark Eyes 2026 — The Complete Guide
- How to Choose the Right Colored Contacts for Dark Eyes
- How to Care for Monthly Colored Contacts
- Are Colored Contacts Safe for Dark Eyes?
- Monthly vs. Yearly vs. Daily Colored Contacts — Which Is Right for You?




Leave a Reply
Your email is safe with us.